Snow Peak Titanium Cutlery – My Review and Why You Need These!

I am sick – really sick – of using little tiny plastic forks.

I’m a big dude. I stay active, I work up an appetite, and so I tend to eat big.

You have to admit, it sucks so bad to dig into a meal with a goofy plastic fork only to accidentally snap it in two or break off one of the tines.

Okay, I realize this strays pretty far from my normal chainsaw topics. But let me explain.

How Titanium Forks Relate to Chainsaws

I’ve mentioned before that some saw jobs I do are in deep country.

Not too long ago, I was describing a chainsaw backpack that is great for getting all of my gear to the middle of nowhere if I get hired for a job like that. You can check out my backpack review HERE.

It’s not unusual for me to pack a lunch.

Whether I’m working out of the back of my truck, or backpacking gear several miles, I definitely don’t like to go hungry.

I’m not against going out to lunch, but I’m all about getting work done. It just seems more efficient if I pack my own meal, sort of eat on the run. It saves me from driving somewhere, waiting in line, etc.

Sometimes that’s just a sandwich, sometimes it’s more like a real meal. By real meal I mean like leftovers from the night before, haha.

After breaking off 2 of the 5 plastic tines of my plastic fork the other day, I was pretty exasperated. It’s pretty hard to eat a leftover chicken breast with a damaged utensil that resembles a toothpick!

So I started looking for some camping or backpacking utensils that I could use to eat my lunch while on a chainsaw job.

Moe’s Southwest Grill Plastic Fork Tease

Issue number one, chainsaw job vs plastic fork.

Issue number two, OMG Moe’s are you kidding me?

I tend to like Tex/Mex food. There is a Moe’s Southwest Grill not far from my house, and I eat there frequently.

They have the cheapest, most useless plastic utensils in the universe.

I’m not kidding you, they aren’t even fit for a four year old. They bend and break, and they are tiny.

Maybe all Moe’s restaurants don’t use these, I don’t know. Maybe it’s only my local place that is too lazy to wash and use metal forks. Leave a comment down below if you get a chance and let me know what your experience has been.

This, combined with my need for something to pack in my lunch for chainsaw job had me looking for some kind of backpacking utensils.

Snow Peak Titanium Utensils

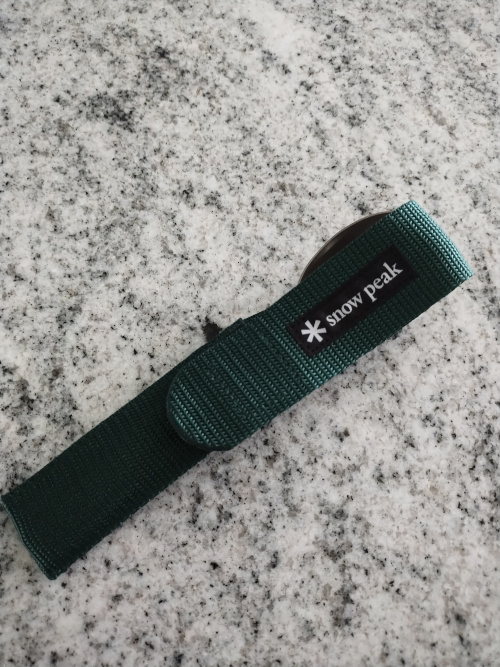
Enter this little kit from Snow Peak.
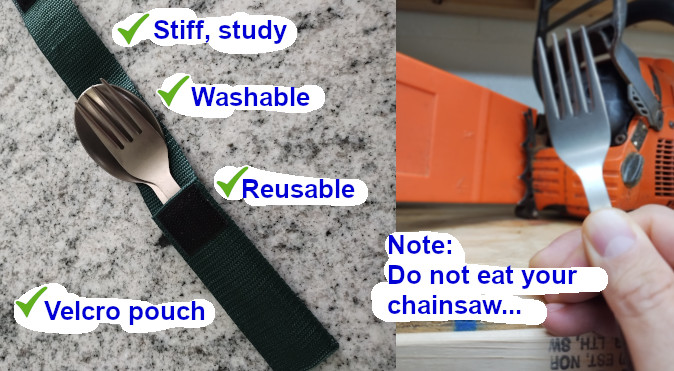
snow peak titanium utensils
No more broken forks! Click –>>HERE<<– to check latest prices on Amazon…

I found a few options online for normal, basic stainless steel utensils. Some of them were even collapsible. Err, ok, but I don’t want “some assembly required”. And leave it to me to lose half of my fork under a tree stump!

I ended up choosing the Snow Peak set for several reasons.

They make them out of aerospace-grade titanium alloy mainly because it is such a light material, which can be important for backpackers. That’s cool, but a few ounces of weight isn’t really a deal killer to me.

The titanium is very stiff. Which I like. And also it’s inert, and won’t rust.

I liked the little velcro pouch the knife and spoon come in. It makes it easier to toss into my gear bag without losing them or having them become separated. It’s made out of nylon, so when it gets dirty I can just throw it in the washing machine or even give it a scrub outside under the garden hose.

Lastly, I liked the fact that their company has been around for 60 years.

They make good quality stuff, and they are proud of what they do. It’s not US based, bummer, but it’s a craftsman-like Japanese company and I give them a certain amount of credit for standing out in a crowd.

So go buy yourself a set, and quit screwing around with plastic forks!

I’ll try to remember to tell you guys sometime about the tactical lunch box I use.

The Best Felling Wedges – What I Recommend

One piece of tree cutting equipment I haven’t touched on yet is felling wedges.

What is a felling wedge?

You may use a felling wedge to basically “shim” a tree as you are cutting it down.

In that case, you would use it to either a) lean the tree one way or another by pounding a wedge (or several) into a cut you’ve created, or b) use it to open up a cut or to keep it open so your chainsaw doesn’t get pinched.

Along those lines, you might also use a felling wedge once a tree has been cut down and you’re bucking it or cutting it up on the ground. Same thing as before, you’ll pound the felling wedge into a cut in order to keep the wood from shifting and pinching your chainsaw.

Do not, under any circumstances, confuse a splitting wedge with a felling wedge!

A splitting wedge is made out of steel. You use it to split wood by pounding it with a maul or the blunt side of a heavy axe.

A felling wedge is typically made out of plastic or some kind of composite material. You do not want to get your chainsaw anywhere near a steel splitting wedge!

Many years ago, when I was younger and dumber (but better looking, ha ha) I was at a job site and needed a felling wedge but only had a steel splitting wedge. I told myself I would be really careful with my saw, and just keep it away from the splitting wedge that I used to keep the log from snapping closed. Well, the saw jerked around a bit and kissed that steel wedge, and all hell broke loose.

The saw kicked back viciously, just about tore my arm off, and the chain broke and whipped around and sliced my face open. Lesson learned, I never did that again!

What I Recommend

So what do I recommend? And why?

Let me tell you what I look for. This seems pretty basic, but I can save you some time by pointing out these basics…

1) Color

The nature of these felling wedges means they are constantly getting stuck between logs, dropped down under logs, or if you’re unlucky shot across a field. I prefer day-glo orange for this reason.

Pretty much any wedge will be a high-visibility color – neon green, or yellow, etc. But I’ve had the most luck with orange.

2) Size

There are two common sizes, a 5.5″ and an 8″. I like to carry both. Sometimes the 5.5″ isn’t quite big enough, and sometimes the 8″ is too big.

Plus I like to carry several of both. These things are cheap, and I don’t want to hike (or drive) to some job site and need another wedge and not have one.

3) USA

Ya’ll know I’d prefer to buy something made in the USA if I can. It’s not an absolute requirement, but why not buy American if you can. Unless you’re reading this as a resident of a foreign country. In which case, why not buy local if you can?

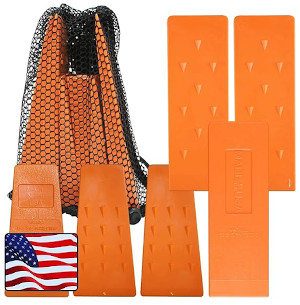
These are the felling wedges I use:

To check Amazon’s latest prices on these Cold Creek wedges- CLICK HERE

These wedges are made here in the US by Cold Creek. They are built pretty tough, and are a good bargain. They come with a little drawstring pouch, which I care nothing about. I use a felling wedge pouch like this one. I guess I will do a separate article sometime on a good pouch I recommend.

How to Convert A Lightswitch to an Outlet

I know many visitors to my site expect me to stick to Chainsaws. But as it turns out, folks treat me more or less like a handyman, and I field a wide variety of questions.

One question I get a lot:

How do I convert a lightswitch to an electrical outlet?

Or:

Jeff, how do I add an electrical outlet?

Electricians are expensive, and I try not to hire one unless I really have to. As it turns out, adding an electrical outlet can be pretty simple under certain situations, and you may not have to spend the money on an electrician.

I recently wired in a new outlet for my neighbor down the street. They had a unique situation. The husband received a 3D printer from the wife for Christmas, and was enjoying using it as a new hobby. But after a few weeks of having it sitting and operating on the table in their dining room, they were wanting to find a more appropriate home for it.

They had a closet off the main hall that had plenty of room. It had some shelves in it and was rarely used. It did have an overhead light with a lightswitch, but it did not have an electrical outlet.

That closet made it very easy for me.

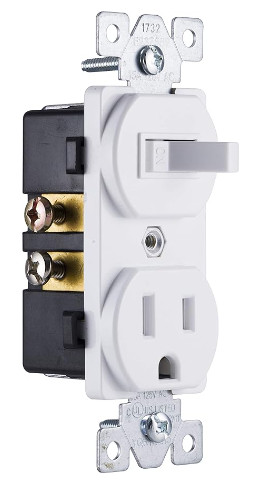
This is what you need…

To check Amazon’s latest pricing, >>>CLICK HERE<<<

Note this method won’t work if you don’t have a neutral wire supplied to the existing light switch.

My suggestions and tips:

1) Turn off the breaker that supplies power to the existing room/light switch.
2) Use a voltage detector or multimeter to make sure the switch doesn’t have power running to it and is safe to work on. Don’t have one? Click here.
3) Pull the switch out of the switch box, and disconnect the wires from the switch.
4) You will probably have two black hot wires (one is line, one is load), and a bare copper ground wire.
5) If you’re lucky, in the back of the box you’ll find a white neutral wire. This usually isn’t being used unless you already have some kind of smart switch installed. If this isn’t present, this method won’t work for you.
6) Figure out which of the black wires is your line wire, and wire it into the appropriate spot on your new switch/receptacle combo.
7) Same thing for your load wire, and your neutral wire. The directions provided with the new switch will tell you which terminal is which.
8) For the neutral wire that you fish out of the back of the box, just take the wire nut off and add a short (maybe 3 inch) pigtail, put the wire nut back on, and wire that pigtail into the correct terminal in the new switch.
9) Depending on what you ordered, you can make the new outlet switched (i.e. it only has power when you turn the light switch on) or continuous. The outlet will have a little bridge bar that you’ll have to remove if you don’t want it to have power continuously.
10) After you screw the new switch to the outlet box, turn the breaker back on and test both the switch and the receptacle to make sure they are getting power and work properly.

Don’t mess around with this if you don’t know electrical basics, as you don’t want to electrocute yourself or create a fire hazard.

That’s my quick/easy method for adding a receptacle to any room that has a light switch!

Let me know if you have questions.

The Best Gas Powered Wood Chipper – My Review of the SuperHandy 7HP Chipper Shredder

Pretty much every time I am chainsawing, I end up with a bunch of branches to deal with.

In some cases, the tree is green an healthy and has leaves on it. In other cases the branches and limbs are dry and brittle. Regardless, they present a problem.

Usually a chainsaw is the best option to get the limbs off the tree. But any limb or branch that is less than around 1.5-2″ in diameter is hard to saw. As the limbs get too small, they scoot away from the chainsaw and you end up chasing them, which is not very efficient.

What am I going to do with this mess of limbs??!

Also, limbs and offshoots don’t just grow straight in one single direction. That have all kinds of curves and kinks. Which means they take up a ton of room, are hard to stack, and even hard to burn in a burn barrel.

My solution is to run all that smaller diameter stuff through a wood chipper.

You may be wondering what’s the difference between a chipper and a shredder? Allow me to clarify. The shredder sort of grinds up leaves and small, thin material. The chipper chops up thicker material.

I would love to have an electric (or even battery powered) chipper. Gas powered ones are noisy, stinky, and tend to be hard to start if they are rarely used and not properly maintained.

But honestly the plug-in chippers just aren’t strong enough for the work I do, and the branches I need cleaned up. I might review an electric one at some point, but for now, I focused on a beefier gas powered version.

Ya’ll already know I don’t have a billion dollars sitting around. I needed something affordable, but durable and powerful. And having used a few chippers before, there were a handful of features I was looking for in particular.

Why I Chose the SuperHandy 7HP 3-in-1 Chipper Shredder

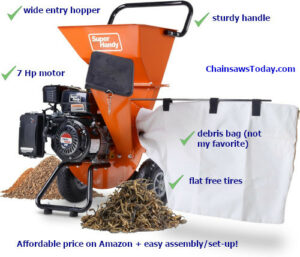
superhandy-chipper-1
This is the one I recommend – CLICK HERE to check prices on Amazon
SKU GUO035-FBA
This thing is pretty beefy. Their website lists it at 136 lbs. I would consider it mobile of course, but it’s heavy enough that getting it in and out of a truck is not fun.

SuperHandy has another 7 Hp version that costs just a few dollars more that is their “compact” version. I think it only weighs 85 lbs. I checked that one out, but I felt like their standard version was built a little better.

It sits about 23″ high by 32″ wide.

The 7 Hp engine has plenty of power. It’s easy to start, and easy to maintain. They made it easy to check the oil, and to add gas.

I will say this thing is noisy, so that’s one drawback. Electric chippers are probably a bit quieter, but pretty much all of these gas powered ones are going to wake up your neighbors and require you to use ear muffs.

It has polyurethane wheels. The last thing I want is another tire to go flat.

It has a 15:1 reduction ratio, and they claim their two cutting blades (combined with the 15 Hp motor) can handle branches up to 3″ in diameter.

In my experience, 3″ is kind of pushing it. It seems to struggle a bit with 3″, but seriously that is a big chunk of wood. Something that big it’s probably just as easy to handle with a chainsaw. I would recommend sticking with maybe 2.5″ diameter, but jam it in there if you need to.

The handle bar at the top is sturdy, and good for shoving this thing around, man handling it, or getting it in and out of the back of a pickup.

I have never used the “vacuum” function, so I can’t really attest to how well that works. But it does a great job shredding leaves and of course chipping.

If you order one, there are a few parts to assemble, but it is easy and only takes a few minutes.

I have used this thing a lot over the last few months. I would guess I have already run it 50 or maybe even 75 hours. I love it, and I’m super happy with the purchase.

My Tips/Tricks for Use

Tip 1 – ditch the bag.

You know the bag SuperHandy provides to capture all the chipped up branches and keep everything neat and tidy? Yeah… throw that thing out.

It will fill up super fast, and be annoying than helpful.

I typically just work without any device to capture the debris. Then I rake/shovel it into a wheelbarrow, and I take it where it needs to go.

If you are working in a pristine area of a yard where you really do want to keep it clean, I guess you could fiddle with it and just empty it every few minutes.

You might be better off shooting it into a 5 gallon bucket?

Adding to Jeff’s equipment list
+ 5 gallon bucket
+ shovel for wood chips
+ wheelbarrow

Tip 2 – get gassy.

You are going to want to keep plenty of gas on hand.

It’s not that this thing is a gas hog. It’s only 7 Hp, so you don’t have to feed a big block here.

But you will be surprised at how much fuel you’ll need if you work it pretty hard over the course of even just a few hours.

+ gas can

Tip 3 – spare a pair.

You should probably have a couple of spare chipper blades on-hand, just in case. These things are pretty durable as long as you avoid gravel, nails, and other non-wood items.

You may be able to get away without the extra cost. But I use my chipper a lot, and outside of routine maintenance and keeping the blades sharp, I don’t want to get halfway through a job and lose a blade and not have a spare.

I think these will fit.

Safety

I know you don’t want me preaching to you, but be careful.

We all want to eat our next meal with all our fingers and toes intact!

Don’t wear loose clothing while operating this thing. Wear eye protection. Wear ear protection (the thing is pretty loud). Don’t let any kids near it. And don’t let any squirrels fall in it (haha).

Ok, so that’s it.  If you are like me and need to spend your hard-earned money to buy a chipper, it’s the SuperHandy I recommend.

Contact me or leave a comment if you want to tell me about your experience!

Firewood Stacking and Storage – Why it really can mean the difference between life or death

What would you do if your power went out?

I mean besides fussing about missing the game, not having wifi, and having to postpone your steaming hot shower 🙂

What if it was out for entire day? A week? A month?

If you’ve been hanging around ChainsawsToday for very long, you know I’m not prone to drama or histrionics. But I’m a firm believer that every home needs a backup heat source.
The house I grew up in (a long time ago) had electric baseboard heaters. It was inefficient and expensive, so we tended to heat our house in the wintertime with a wood stove and a fireplace. The electric heat was of course a lot less trouble than a fireplace. You could just spin the thermostat’s dial and relax while the temperature climbed. You didn’t have to cut wood, split it, stack it, carry it inside, build a fire, maintain a fire, carry ashes out and dispose of them.

On the other hand, the wood heat never let us down. A power outage did not affect our ability to stay warm. There are lots of steps we should all take to guard against emergencies, storms, unexpected and uncontrollable events. But backup heat is pretty high on my list.

The cool thing about the topic of stacking and storing firewood is that it applies to so many people. On one end of the spectrum, we have folks who heat their homes exclusively with wood. Maybe towards the middle of the spectrum, we have folks who only burn wood in the fireplace. And then on the other end of the spectrum are the folks who only build a fire in the back yard on rare occasions, really just for fun or to cook some smores with the kids.

I bought a fire pit the other day that I love, by the way. It is one of those gigantic smokeless jobs from a company call Breeo. I sought them out because I wanted something durable that was made in the US of A. I think you can find them here:

Note to self: publish something here on the site about fire pit reviews.

Pretty much everyone should have a way to burn wood for heat, even if it’s “just in case”.

That means pretty much everyone should have some wood around.

Annnd, that means all of us should be stacking wood somewhere.

I am going to give you some tips about stacking and storage.

Seasoning is key. You want your wood moisture content to be 20% or lower. So…

Tip #1 – don’t burn green wood.

With enough experience, you can simply look at a piece of wood and tell whether it’s seasoned or not. Barring that, they do make moisture meters that make it a lot easier and less subjective.

The age of the wood is important. If it was recently cut down, it may still be full of sap and moisture. You will want to leave it to season for a year or two before burning it.

Tip #2 – don’t stack your wood on the ground.

Wood is porous. It tends to wick moisture. As firewood sinks into the ground, it will absorb moisture and may even start to rot. This can affect the row of wood above it, and the row above that, etc.

Tip #3 – Stack your wood bark side up.

The bark of the tree is a natural protectant. It will tend to shield sticks of wood from rain and snow, and help the rain run off to the sides instead of being absorbed.

Tip #4 – Both sunlight and air are good.

Remember, we want to “season” the wood. Covering it is good, but not wrapping it. Of course, it’s firewood so it’s not like it’s ruined if it gets wet!

But ideally we would store it under an awning or a tarp or a lean-to. And ideally, the covering would be high enough to protect it from rain and still allow direct sunlight. We really want that wood to bake in the sun day after day. Then it will burn clean, dry, and hot.

I have plenty of property. I don’t live in a neighborhood, and have no nosy neighbors to complain about my yard. So I don’t have to be picky about racking.

I learned how to do my own easy DIY firewood rack with a concrete block and a couple of knotty, warped 2×4’s. Here’s a picture of one of the dozens I have at the back of my fence line.

I typically staple a piece of re-purposed cardboard across the top, with re-purposed shrink-wrap over the cardboard.

This setup gets plenty of airflow, plenty of sunlight, keeps the wood off the ground, and is super cheap.

If you want something a little nicer, or your HOA does (ha ha!), you can get some pretty nice ones for $50-$100:

If any of you have your own tips/tricks, contact me or leave a comment, I’d love to hear them!

Log Peavey Review – My Recommendations

Anyone who does very much sawing, anyone who starts to move beyond the very occasional backyard emergency response, is going to need a log peavey. If you have ever used one, I’m sure I just got your 100% stamp of approval with that statement. And if you’ve never used one… you are about to discover a chainsawing secret!

What is a Log Peavey

It’s a mistake to think chainsawing is all about sawing wood. It’s not that simple.

You have to saw it, yes, of course. But you have to fell it (cut the tree down). You have to remove limbs. You have to split wood, haul it, stack it, burn it, inspect it, measure it. You may have to sell it or even go get a permit to do something.

So what’s a peavey? Imagine a long lever arm you can use to multiply your strength.

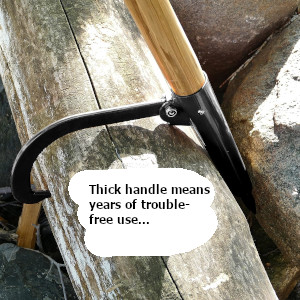
They are typically made with a very thick handle, that can easily resist all the force you put into it. And that is topped off with a pivoting hook with its own sharp point that can jam into a log. And the third element is a second sharp point at the top that can be used to poke, pry, etc.

History of Log Peaveys

Maybe you didn’t come here for a history lesson, but I bet you’ll find this as fascinating as I do. The reason I say that, my post from awhile back on the history of the chainsaw is one of the more popular topics on the site!

There was a guy named Joseph Peavey. He was a blacksmith in Stillwater, Maine. He’s the guy who was credited with inventing the Peavey in 1858, hence its name.

This guy was basically a mechanical genius, and is credited with many other inventions, including
– Peavey hoist for pulling stumps and lifting dam gates
– hay press
– wooden screw vice
– special inkwell
– a new waterwheel

His son Daniel helped him make the first prototype, which they continued to tweak and modify to improve its performance.

James Henry Peavey, who was actually Joseph’s grandson, perfected the device and its design into what so many of us use today. These were manufactured and sold through the Bangor-Edge Tool Co (see photo).

One side note. I frequently see stores, catalogs, and websites misspelling it “Peavy”(sic). Please help me stamp out the ignorance! The guy who invented it is Peavey, let’s make sure we get his name right.

What is a Log Peavey Used For?

Although it’s really an indispensable tool, it is most helpful in three cases:
1) Turning a heavy log or piece of wood so you can cut the other side of it.
2) Moving, dragging, or shoving something out of the way.
3) Prying a piece of wood apart.

These are not lightweight, high precision tools. They are beefy, brutal, and made for big nasty guys to do big nasty things with! And hey, I don’t mean to be a close-minded old fart – there are a lot of women out there these days making the chips fly. And the gals I know have no qualms about throwing a shoulder behind a peavey.

My Recommendations

I’ve used a lot of different log peaveys over the years, some good and some bad.

A peavey comes in different lengths. It’s probably best to consider how tall you are, how strong you are. For that matter, it’s probably best to consider your budget. But for the sake of simplicity, I’m just going to tell you what I like, and let you make your own choices.

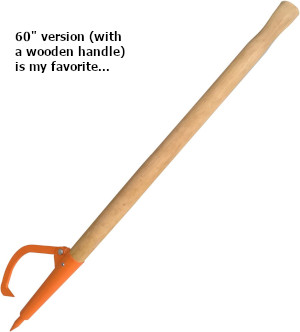
I prefer longer peaveys, and I prefer they are made out of wood.

In general, you’ll find 58″, 59″, or 60″ tools for the long version. The shorter versions are usually 48″ or 49″. The reason I prefer the longer ones is just leverage. Remember Archimedes saying give me a long enough lever and I can move the world? Well, I don’t know about the whole world, but I have run into some big, heavy, stubborn pieces of wood.

The longer tool is typically heavier, and yes that is a drawback. Especially if you’re carrying a bunch of gear a long distance out to a work site. But I’ve found the benefit of the extra leverage and extra force is worth the drawback of the extra size/weight.

Why do I prefer wood? Well, I don’t know. I guess it’s hard to explain.

There is a certain sense of rightness, and fairness in using a tool crafted from wood to do woodworking. And also, I’ve found, even when wearing gloves, a wooden peavey is a little more forgiving and agreeable in my hands as compared to steel.

This article is getting a little long-winded, so let’s get to my suggestions.

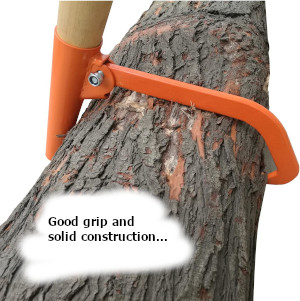
This particular one from Lowf is what I’ve been using for years now. It is 60″ long, with a 16″ hook opening. The handle is wood, and is a beefy 2.5″ in diameter.

–>>>Click HERE to check “Lowf” prices on Amazon<<<<--

The only negative comment I have is about the fastener the hook pivots on. One time, my nut came off, and then of course the bolt fell out and my hook came loose. I was able to reattach it and keep working, but I wish the screw was a bit longer, and that way I could double-nut the whole thing.


>>Check the latest prices for the 60″ peavey on Amazon – CLICK HERE <<…

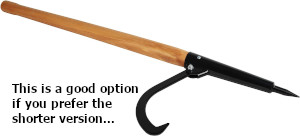
If you prefer a shorter version, give this peavey a try.

It is 49″ long, and has a high quality carbon steel head and hook on it. The hook has a 15.5″ opening. The handle is wood, and it’s 2.3″ in diameter.

I do not own this particular one, but it’s the exact one my neighbor has. I have used his many times, and it is a good solid piece of equipment that is worth its price.


>>>Check latest prices on Amazon for the shorter peavey – CLICK HERE!…<<

So that’s it. If you have any feedback or suggestions for other good log peaveys, feel free to leave a comment or send me an email.

Jeff